How to Transfer Contacts from iPhone to Android

Top Contacts Transfer Apps


Recommended Guides
Table of Contents

How to transfer contacts from an iPhone to an Android device
Working between iPhone and Android systems can be a confusing undertaking. While each fantastic in its own right, these very different operating systems can add an unnecessary level of complexity to tasks which you, the user, quite rightly expect would be simple. With that in mind, we have developed an easy-to-follow tutorial which should tell you all you need to know about transferring contacts from an iPhone to an Android.
Why do I need to know how to transfer contacts from iPhone to Android?
Learning how to transfer contacts from iPhone to Android can be useful in many cases, both in our personal and private lives. Reasons here include:
- Upgrading to a new phone
- Replacing an older phone
- Transferring contacts between family members and friends
- Moving numbers between personal and work devices
The first step is to back up your contacts and we explain how to do this further down the page. Backing up your contacts helps you transfer them, but it is also a good idea in case of theft or accident. Losing a huge collection of numbers can be a major nuisance, so by following this step alone you could save yourself considerable suffering should the worst come to pass.
How to copy contacts from iPhone to Android - The Hard Way
The most basic way to move contacts is to perform each transfer manually, one by one. As such, it won’t be feasible for users today wanting to transfer their entire contact list, but it can be useful for those needing to move only a few contacts.
Method:
- Open up the contact lists on both iPhone and Android
- Open the details on iPhone of the user whose information you wish to transfer
- Create a new contact on Android for this number, and fill the desired details
- Repeat steps 2-3 for all desired contacts.
It’s also worth remembering the risk of error for this method – when carrying out transfers in this way, make sure you double and triple check each entry!
How to copy contacts from iPhone to Android - The Easy Way
How to copy contacts from iPhone to Android – the new way
Instead of doing things manually, we recommend a simple process which can perform all the hard work for you. This comes with a few basic elements.
- Back up
- Export
- Import
- Restore
- Clean Duplicates (optional)
The easiest method to accomplish these steps is through the installation and use of two or three key apps. These are:
- Simpler Caller ID for Android
- Easy Backup for iOS
- Cleaner for Android (useful for cleaning duplicates in Step 5)
With that in mind, let’s get started.
Install Easy Backup
Before we begin the process, you should ensure that your devices are fully charged and/or plugged into the mains. Power loss during any part of these steps is usually fixed by simply starting the process over, but occasionally much larger unpredictable issues can arise, so keep this in mind.
Once charged, you need to install the Easy Backup app above on your two devices. These are quite small, coming in at around 10Mb, so you don’t have to worry about them taking up space or slowing your device down.
Step 1: Back-up
As soon as you open the Easy Backup program on your iPhone it will ask for permission to access your contacts list. Since this is a key part of copying the list, you want to touch accept or allow.

From here you will be asked to create an account. You can choose to connect an existing Google or Facebook account. Doing this will require you to accept the terms of service, so again select agree, or accept.

Once the two services are connected, touch the “Backup now” button which appears and follow the simple prompts. Once complete, it will allow you to export your contacts.
Step 2: Export
The export screen will give you three different options for where to place your backup contact list. The easiest is the upload button, which uploads your contacts to the cloud. This will associate them with your Facebook or Google account, making them easy to retrieve on your Android later.

The other options are the email and export buttons. Selecting email will allow you to use one of your phone’s mail apps to send the contact list as an attachment. Export will give you a wider range of potential export options, some of which might not be applicable depending on which apps you already have installed on your phone.
Step 3: Import
Now, open the same program on your Android device, and log in as you did with your iPhone. Note that to import the contacts list that you exported from the other device, you will need to connect using the same Facebook or Google account.

At the bottom of the screen, you should see an option named My Backups. Click this and you should see the options Local Backups and Cloud Backups.
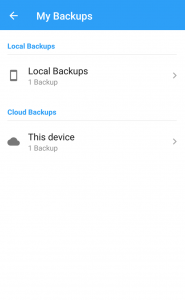
If you chose the cloud backup option in step 2 then click on this, then proceed to the next step. If you chose a different method to export your contact list, you will first need to download this contact list to your Android from wherever you sent it. After this, click on “Local Backup”, then proceed to the next step.
Step 4: Restore
Simply press the “Restore” button and it will easily transfer all of your previous contacts onto your new device! Be sure to double-check that everything is in order with your contact list.
You could then delete this program, but it is good practice to keep them installed. This way you can regularly update your backup list in case of an unforeseen issue.
This is all you need if all you want to do is transfer your contacts list, but if you notice issues with duplicate entries, then move on to the final optional step.
Step 5: Clean Duplicates
To help you tidy up duplicate entries, install Cleaner from Google Play.

Once installed, open the app and give it the permissions required. Again, connect with your Facebook or Google account.

Touch the small joined arrow symbol towards the top of the screen, then press the symbol in the center of the screen to show all merges possible. Finally, select merge from the bottom of the screen.
All Done!
With that step, everything should now be in perfect order. Note that this method can also be used in reverse should you want to transfer from Android to iPhone!
We hope this tutorial was helpful, and please think of us in the future for all your phone tutorial needs.
Comments