How to Transfer Contacts from SIM to iPhone

Top Contacts Transfer Apps


Recommended Guides
Table of Contents

Learn How to Transfer Contacts from SIM to iPhone
When you upgrade to a new iPhone, it’s always an exciting time in which to test out the latest apps. However, more importantly, you also need to ensure that your contacts have been properly installed on the new phone.
If your previous phone was an Android device, then one option is to transfer these contacts via a SIM card. You can also import a contacts list from a friend or colleague, which is another task that is easily done when transferring from a SIM card. However, there are many options available, some of which you may find easier than others. So, in this article, we’re going to teach you all you need to know about how to transfer contacts from SIM to iPhone.
Method 1: Backup and transfer using your SIM card
Step 1: Backup your contacts to a SIM card
Backup a contact list to SIM from an Android device
It’s possible to backup contacts to a SIM using the Contacts app, which is found on every Android phone. To do this, you just need to follow these easy steps:
- Open the Contacts app
- Select “Export”, which is sometimes marked as “Import/Export”
- Choose to “Export to storage”
- Choose where you would like to export from, for example, your phone or Google account
You will now have a .vcf file on your SIM card that you can transfer to another phone by following the process in Step 2, which you will find below.

Backup a contact list to SIM from an iPhone
In days gone by, there was a way to backup contacts to a SIM using your iPhone. However, today, unless you jailbreak your device, it’s not possible. The reason for this is that Apple wants to your store contacts directly on your device which, in turn, means the company’s cloud servers.
Basically, when you need to back up a contacts list, you’ll do it via iTunes or iCloud. These have essentially taken over the role of SIM cards as storage devices. Why? Well, according to Apple, it’s safer. Because SIM cards are removable, there’s more chance you could lose your contacts (i.e. lose the SIM card). To avoid that, the developers have made it so SIM backups aren’t available anymore.
Therefore, when you want to save contacts to your iPhone and have a backup in case of emergencies, you’ll have to complete the following steps:
- Go into Settings on your iPhone.
- Click on contacts.
- Hit “Import SIM Contacts”.
- Select “iCloud”.
Once you’ve completed those steps, the software will automatically send you contact list to iCloud and you’ll have an online backup ready to use whenever it’s needed.
Step 2: Transfer contacts to iPhone
To transfer contacts from SIM to your iPhone, start by finding the right option in your phone’s Settings app. Make sure the SIM card containing the contacts is inserted into your phone and then:
- Tap “Settings” on your iPhone
- Choose “Contacts” from the list
- Tap “Import Contacts”
If these contacts have been imported from a different SIM to your usual one, you now need to insert your iPhone’s SIM card.
To check if the transfer has worked, you can simply open the Contacts app on your iPhone and the new contacts list should be present.
Method 2: Backup and transfer your contacts using Easy Backup
Although Apple has simplified the process of storing and transferring contacts, there’s a better way. Instead of worrying about SIM cards or iCloud, it’s possible to use Easy Backup to manage your contacts. The reason this solution is ideal for modern mobile users is flexibility.
Instead of chaining you to one service, device or operating system, it allows you to cross boundaries. In other words, when you download Easy Backup from the App Store, you’ll be able to save, send and restore contacts in any way you want.
To show you what we mean, here’s how to transfer contacts with Easy Backup once you’ve downloaded the app on each device and registered an account:
Step 1: Backup
- Start by selecting the “Backup now” option.

- Select “Tap to Upload” to do just that and save all of your contacts to Easy Backup’s cloud.

Step 2: Restore
- On your other device, log into the Easy Backup app then go to “My Backups”.

- Select “Cloud Backups”.
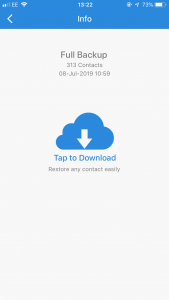
- Find the backup file that you just uploaded from your other device.

- Simply select the “Tap to Download” option and download your backup.
- Preview your selected backup.

- Choose some or all of the backups from the list, tailoring these options to suit you.

- Lastly, select “Restore Contacts” to complete the process.

Following the above steps will allow you to store and transfer contacts. However, as we mentioned earlier, this app gives you more flexibility. For example, you can use it to move iPhone contacts to an Android device. To do that, just download Easy Backup from Google Play and carry out Step 2 from the above process on your Android device – it’s as easy as that!
That, for us, is why Easy Backup is the best contact management solution. Although it’s important to learn how to transfer contacts from SIM to iPhone, this limits your options. If you want full control over your data and have the ability to switch devices at will, a dedicated app such as Easy Backup will always be the best option.
Comments