How to Delete Contacts on Android

Top 5 Delete Apps


Recommended Guides
Table of Contents

Find out How to Delete Android Contacts Easily and Safely with Our Guide
Dealing with bloated or messy contact lists on our phones is a problem that many people will face, regardless of their chosen device. This can happen for many reasons, including:
- Shared business use of contacts
- Busy social life
- Outdated contacts you’ve not cleaned up in a while
- Duplicate contacts taking multiple entries
These and many other possible scenarios can lead to situations where you have no choice but to delete some contacts in order to keep your address book updated and efficient. With that in mind, we created an easy to follow delete multiple contacts on Android guide to help users perform this task quickly and without issue.
In this guide to deleting contacts on Android, we have included a couple of different methods: the traditional method many might already know and a newer and potentially faster method. While we would obviously recommend the faster method, users with smaller lists or who don’t have access to downloads might still want to consider the first option.
Before we begin, we would suggest heading over to our backup tutorial section, to ensure you can get back anything you may lose through user error. While not a strict necessity, there can always be times when we make mistakes, so this is a good safeguard in case the worst happens.
Then, ensure your mobile device is charged and follow our detailed steps.
Old Method (slow)
Step 1
The first method in our Android guide to deleting contacts requires you to open up your contacts page, which should be accessible from the main screen of your Android device.
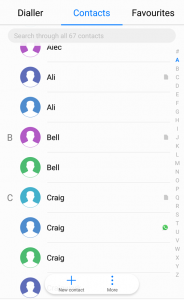
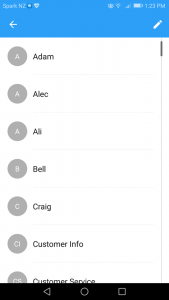
This should bring you to a page like that shown below.
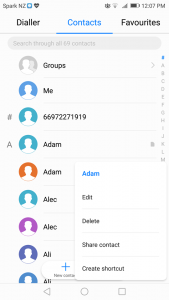
Step 2
On this page, you can press and hold on a name to highlight it, or quickly press it to reveal more information. Following a long press, you can then touch the delete option which appears to remove the entry.
What Makes This Method So Slow?
An important factor to keep in mind here is that entries that appear to be duplicate might actually hold additional important details. Take the Craig entry from the image in step 1, for example.
The green phone symbol on the right side indicates that this is an entry used in Whatsapp, a popular communication app. This means that you to be wary about what you delete, as some deletions will only apply to certain apps.
While, in this case, the app is clearly labeled, but other times it might not be quite so clear.
The good news is that this is all the work this method requires. Simply go through your list, and delete what you do not want or need.
We don’t recommend this method as the best choice because not only does it take a long time to find exactly what you want, but because it comes with such a high risk for user error. What’s more, if you want to delete many contacts, having to long tap each one and find the right symbol can take a while.
Instead, if you have a choice in the matter, backup your contacts with a relevant app, and move on to the next section.
New Method (fast)
In this method, we will use a powerful app called Easy Backup to allow for a much more targeted and easy to understand type of deletion.
First, download and install the app found at this link on your mobile device, and then continue to the first step of our deleting contacts Android guide below.
Step 1
Once you download and run the app on your phone, ensure that you are on the leftmost page of the app as indicated by the little person icon shown in the image below.
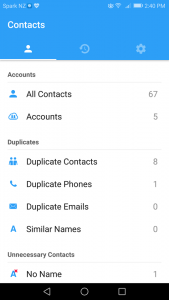
Unlike a regular Android contacts page, this one can help sort out many different user contact information to better aid you in finding what you need. Scroll down to see more.
Scrolling down reveals some of the more important filters, such as the unnecessary contacts screen.
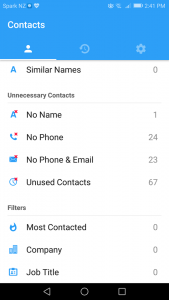
From here, we can narrow down the search further by going into the accounts section at the top of this page. This is perhaps the most important feature for helping us find and delete exactly what we want. Press on this to see what it includes.
The account section is so useful here because it includes all of your contacts from a wide list of apps and locations, arranged in simple to read categories. Unlike the first method in this guide, this takes all of the guesswork out, letting you see exactly how many numbers are stored, and what account or app they are associated with.
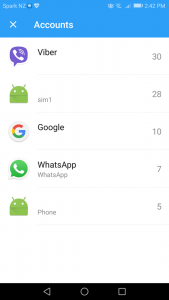
You can select an account to deal with that app directly, or go back and choose one of the other options to display the contacts you wish to deal with.
When you know the list you want to deal with, go into that section, and we can get started on the deletion process.
Step 2
You will then find yourself on a screen that includes all the contacts within your search parameters. In the case of the below example image, this is from the SIM contacts option in accounts.
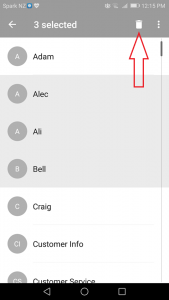
Here, you can tap to see more detailed information about the contact entry. Once you are sure you have what you want, you can go back to the above screen, and hold on the contact to start the selection process.
You can select as many contacts as you desire, then hit the trash can icon which appears at the top right to delete.
Step 3
Finally, you will be prompted with a confirmation screen such as the one below.
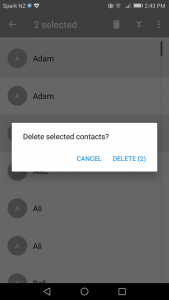
Press delete and the contacts will be removed. Here you can continue the process with the different search parameters you desire, or close the app if you are done, it’s that easy.
As you can see this method is much more straightforward, and also allows you to choose multiple contacts to deal with in one go based on a wealth of different parameters.
For any other issues regarding dealing with mobile contacts, check out everything we have to offer here. Otherwise, we’re glad we could help, and we hope you have a great day!
Comments