Export Contacts from iPhone
Table of Contents

There are a number of common reasons why you might need to export contacts from your iPhone to another device. Maybe you’ve purchased a new mobile. Maybe you’re looking to share certain contacts with a friend or colleague. Whatever the reason, we’re here to clear any doubts and let you in on a few useful ways to transfer your data.
You’ll be glad to hear that the days of typing out and transferring an endless stream of contact names, numbers, and email addresses from one device to another are getting further and further behind us. In today’s world, there are a few nifty tricks and tips that can really help to make your life a whole lot easier. All you have to do is read up on the best way that works for you – let’s take a look.
Method #1 – Via Easy Backup
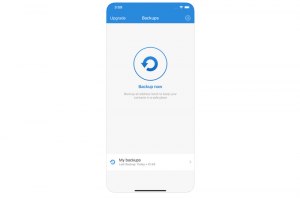
There’s an app for everything these days, so it’s no surprise that there is a range of different options when it comes to exporting contact data. By far the easiest method of doing so is to download a specialist app like Easy Backup, which takes all the hassle out of managing and transferring contact data between different devices.
Here’s how it works…
- Download the Easy Backup app from the App Store.
- Log in and click Backup.
Of course, for those looking for even more control over their contacts, Easy Backup also provides additional options. For instance, you can choose “full backup” to backup all contacts or select individual contacts.
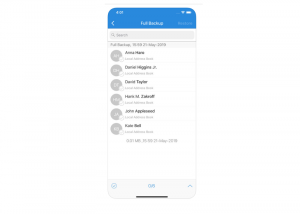
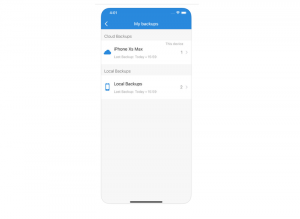
- Once you’ve backed up your contacts, you can view and export your backups.
They can be exported and sent Email, Dropbox, Excel or Google Drive. By far the easiest method, though, is using Easy Backup itself: just install it on a new device in order to restore your contacts, or use it on the same device, selecting “Restore”.
Method #2 – iCloud
Before specialist apps entered the market, iCloud was definitely the most common method of transferring contact data for the average iPhone user. And yet, even today, many people remain unsure of how exactly it works. Simply put, iCloud is Apple’s cloud storage network, allowing users to store all their phone data, photos, videos and general files online. The same goes for contact information too.
If you’re upgrading from one iPhone to another, then simply log in to your iCloud account when prompted on the new device and all of your data should be transferred automatically. It’s definitely a good idea to check that all your contact info is syncing with iCloud before you try to export any data. To do this, open up Settings on your iPhone and select Mail, Contacts, then Calendars. Scroll down until you see Contacts and ensure that the Default Account is listed as iCloud. This will ensure any new contacts you add will be saved in your iCloud account without you having to do anything.
If you’re exporting the contacts to an Android or another device, first check that you’re happy that all contact info is saved in iCloud and then export the data using the following steps:
- Using your laptop or PC, navigate to iCloud.com and enter your login details (you may be sent an authorization code directly to your mobile device).
- Select the individual contacts that you wish to export, or click on the Settings cog and “Select All”.
- Click Contacts and then select the individual contacts that you wish to export, or click on the Settings cog in the bottom left corner and “Select All”.
- Click the Settings cog again and select “Export vCard…”
- A .vcf file will then automatically download, which contains all selected contact info.
- Plug your new device into the computer, open the file directory and copy the .vcf file to local storage. You will then be able to import all the contacts using the Contacts or another relevant app on the new device.
Method #3 – Email
In this day and age, most people are used to housing their contact information as part of a comprehensive email address book. Whether it’s Gmail, Outlook or any other service provider, there’s almost always an intuitive export wizard designed to make sharing and transferring long lists of contact information as simple as possible. Let’s take Gmail as an example…
- Navigate to iCloud.com and follow the steps listed in Method #2.
- Download the .vcf file.
- Log in to your Gmail account.
- Click on the Gmail logo in the top left corner.
- Select Contacts.
- Select the dropdown menu and choose Import.
- All contacts will now be synced to your Gmail account and any other connected Android devices.
Method #4 – Manually
In this day and age, there really is very little need to go through the hassle of manually typing and transferring a huge list of contact info, numbers, emails and that sort of thing. That said if you’re only looking to export a few key details or a short list of contacts then doing so manually may be suitable.
You can also quickly share contacts via email or text, then open the contact file on your new device and save it to your contacts. Bear in mind that it’s probably best to avoid this method for anything over 10-15 contacts if you’re looking to save yourself some time!
So, as you can see, there’s plenty of options to choose from, though some are certainly simpler and less time-consuming than others. Whatever you decide, it’s always a good idea to backup your contacts regularly to avoid any potential hassle in the event that something goes wrong with your iPhone. You’ll save yourself a lot of time and stress in the long run!
Comments