How to Import Contacts from Gmail
Table of Contents

Gmail is one of the more useful and ubiquitous email services out there today. Free and with a wealth of features, it has been a great aid in many of our personal and professional lives. One of its more useful additions, and the one which we want to look at in this guide, is its ability to export gathered contact lists so that you can import them to your smartphone.
This can be useful for a wide range of reasons, including:
- Updating an old device
- Filling the contact list of a new device
- Recovering contacts in the case of an unexpected failure
- Sharing contact lists between friends, family or co-workers
Learning how to import contacts from Gmail might seem complicated but with this guide, you should be on your way quickly and without issue.
Getting Started
Before we get into the tutorial proper, we’ll go over what you will need to follow the guide to completion. Ensure that you have all of the following:
- A fully charged mobile device
- A connection to the internet on both your mobile and Mac/PC
- An active Gmail account from which to copy your contacts
Have all of that ready to go? Let’s continue.
Exporting Gmail Contacts
Before you can import the contacts that you have backed up on Gmail, you’ll need to export them to a file.
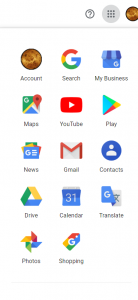
This can be done by logging into your Gmail account on your phone and selecting the Google Apps options button (nine dots) in the top right of the screen. From the dropdown box which appears, choose Contacts. This will bring you to your contacts page.
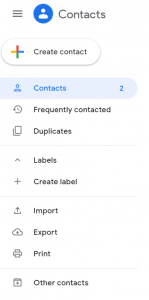
Now, click on the three horizontal bar icon at the top left of the page to open the Main Menu. From here, click the Export button (selecting “More” if Export doesn’t appear at first).
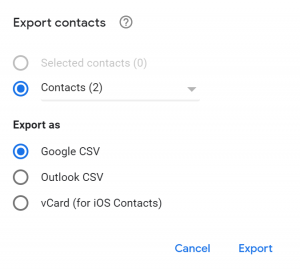
You will then be greeted with the possible options for exporting your contact lists. If you intend to export to an Android device, select Google CSV. iPhone users should select the vCard option.
This will create a .csv or .vcf file containing your contacts, which will be downloaded onto your computer.
Moving the Contacts File
Before we can import this file, we first need to ensure it is placed within the correct device. Luckily, we already have Gmail for this, so it is a very simple task. All you need to do is:
- Address an email to yourself
- Attach the downloaded contacts information file and send
- Open the email on your target device, and download the attachment onto it.
With all of that completed, we can move onto the next step.
Importing Contacts from Gmail to Your iPhone or Android Phone
Once you have the .vcf contacts file on your iPhone or Android, you are almost done. At this point, all you need to do is locate where the file attachment has been downloaded, and open as you would any other file.
Since both Android and iPhone already understand this file type association, they will automatically use this as a basis from which to add to your contacts list. Just follow the simple instructions, and you’ll be on your way in no time.
One final step which might come in handy is using a program to find and remove duplicate entries which might have crept into your contact list. Head onto the next section for this, otherwise, you’re all done!
Cleaning up Duplicates
Duplicate entries are a common problem which many users have, especially if longer contact lists have been created over the years. However, rather than sorting through these manually, we’re going to use an app to do the hard work for us.
Both of the options below use the exact same method, with the only difference being the app version.
- Users on iPhone should follow this link to download their version from iTunes.
- Android users should instead follow this link to download their app from the Google Play storefront.
In both cases, you’ll need to download the app, install it, and open it up.
Duplicate Contacts Cleanup
Step 1:
Press Get Started when the app opens and log in.
Once on the main screen, select the option toward the top of the screen which appears as two arrows joining together.
This will bring you to the next page, which details all of the possible merges from your contacts list. As this will remove any duplicate entries you have, this is the option that we want.
Step 2:
For the next step, all you have to do is press on the Merge button on the bottom of the screen.
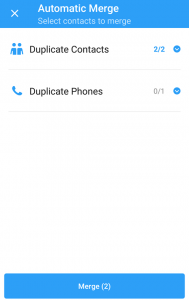
Follow the simple instructions which appear, and wait for the app to work through your contacts list. This will only take a few moments, with longer lists taking longer periods to complete.
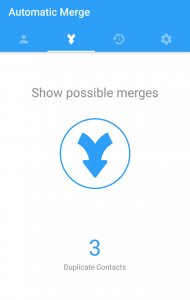
Once this process has completed, you will be greeted with the following screen:
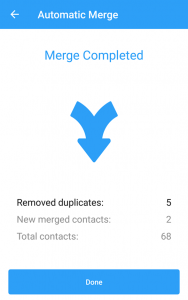
This lets you know exactly how many contacts the app has worked through, and the changes which have been made to your contacts list.
At this point, we are done, and everything should be in perfect working order. Easy as that!
Future Protection
To make things easier moving forward, you can choose to backup your contacts more easily using a backup app. This will allow you to import them on new devices and restore them in case of loss quickly and seamlessly. This can be a big help if you ever have your phone stolen, too.
We have other guides to help in this regard, including popular tasks such as creating cloud backups on your iPhone or Android, transferring contacts between iPhone and Android devices, and many
Comments